
Features
Practice
Technique
Headaches
Fascia is the tissue that gives your body its structural form or shape. How the skeleton is positioned, how the muscles are shaped and the body’s general posture is determined by fascia. The subcutaneous – or superficial – fascia surrounds the whole body and can be described as a living body suit.
September 22, 2009 By Barry Jennings BA RMT CMFR
Why Work Fascia?
Fascia is the tissue that gives your body its structural form or shape. How the skeleton is positioned, how the muscles are shaped and the body’s general posture is determined by fascia. The subcutaneous – or superficial – fascia surrounds the whole body and can be described as a living body suit.
The fascia bags in which your organs develop is the subserous fascia. Deep fascia envelops the muscle groups and individual muscles. The periosteum is the fascia which surrounds the bones and is also considered to be deep fascia.
Each group of muscle has its own fascia and each muscle in the group has a separate fascial sheath. In fact, John Barnes (a leading physiotherapist and myofascial trainer) believes that the entire neuromuscular and cardiovascular system is composed of tiny fascial tubes – right down to the tiniest microtubule.
Research is indicating that each cell can communicate, and that consciousness is communicated through the microtubules, which is part of the fascia. If this is correct, then working the fascia through manual therapy is very powerful. And that has been the experience of many therapists.
What you are working with is the largest organ in the body – which dictates not only what you will look like, but how you feel, move and probably live. Fascia work will enable you to become more flexible in how you treat and how you envision the body and the symptoms with which you are presented clinically. By working the fascia, you are working the whole body’s systems.
Surviving as a therapist
See this work as energy conservation techniques. You don’t have to sweat it out and hurt yourself in order to get an effective change for your patients. And, isn’t that your main intention – to make a beneficial change in the tissue of the person on the table? Myofascial release is extremely different than Swedish massage in physical output.
Swedish work is quite taxing, especially if you need to be deep. If you change your intent and modify your technique, you’ll feel less tired, do effective work and be more likely to avoid injury and burn-out.
Success with this work
Do you remember when you did your first real manual technique at school? It probably felt awkward and unnatural. Yet years later, you perfected it and obtained confidence with what you know and do. Well, these techniques might feel like starting over. In this course, you will be taught some of the best manual techniques known. Your job is to allow yourself to feel awkward and learn. You deserve to give yourself some time with this new work.
Don’t be afraid to use these techniques on your regular clients – they will like the new work and actually request it. And the reason is that they simply want to feel better. These new techniques help to do this. Give yourself some time, and you will see results beyond belief.
Incorporating the new techniques
If you ever take a course and the instructor tells you to give up all your past techniques and do only their work, walk out! The growth of a therapist is directly related to their knowledge and skill. You should never give up what has taken you years to perfect. The best approach is to incorporate the new techniques and develop the best treatment you are capable of providing. That is how these courses were designed: to allow you to progress further toward your goal as a therapist, as well as to help your clients – and save your body in the meantime!
Myofascial intent: Intuition
What separates a good technical therapist from a master is intuition and intent. Far beyond doing slick techniques, the master therapist knows intuitively when to go into a tissue and, more importantly, when to leave. We all have that ability. The therapist needs to slow down and become more observant of nearly in-visible signs from their patient. A good way to start is to watch their breathing. When the client is breathing slowly and calmly, this is the time to go into the tissue. Let your hands become part of their body, almost like you’re woven into their tissue.
Take a lot of breaks, watch your patient, give them and yourself time, and do less. All of this will begin to allow you to see what you may not be able to see and feel now. If you are trying to do a technique and you can’t seem to get it right or find the proper position – or if the tissue is resisting too much – stop.
Take your hands off the patient and watch their breathing. Have them take a deep breath into the area. Calm yourself and have a sip of water. After a few breath cycles, try again. You will find the tissue has changed and both of you are ready.
Remember the client has come to you to get well. Do not worry about the number of strokes or techniques, or even how much time you have kept your hands on them. This is myofascial release – and the strength of the work comes from integration of the new structure into the body.
Teaching your clients about Myofascial Release
Because of the nature of the work, it is very important to communicate the therapeutic nature and reasons for the work to your patients. It is important that there is a mutual trust and respect and an understanding relationship built.
In discussion about the work, take as long as you need so that the patient fully understands the value and therapeutic reasons for these techniques. Then, before the treatment, you may choose to ask them to read and sign a release form.
This is important for both the patient and therapist. The form strengthens the communication and therapeutic purpose for the treatment. Clients often appreciate the form and feel that it lends professional respect and credibility to the treatments. Therefore, we highly recommend
you use a release form.
What to expect with these treatments
Generally, you will see a significant postural change within one to six treatments. More importantly, the client feels and sees changes fairly quickly. Before the session, leave the treatment room and ask them to look at their posture in the mirror. After the treatment, have them repeat this and note any changes they see or feel. Invariably, you will hear positive statements from patients after treatments. Comments such as: I feel taller, I can breathe more deeply, and my body feels more open are common. Some will be astonished with the changes in their bodies.
 |
|
| click here for larger image |
|
 |
|
| Click here for larger image |
|
 |
|
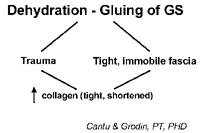
| Trauma, Dehydration, Glue-Tight Fascia Click here for larger image |
Fascial Anatomy
The basics
Superficial fascia lies under the skin and connects to the deeper
fascia. It is one continuous layer of fascia. The deep fascia surrounds
all muscles, organs and bones. Between the two layers of fascia is a
potential space. Superficial and deep fascia merge at bony margins;
e.g., clavicles. These tend to be very sensitive areas.
Some fascia has the strength of approximately 2,000 pounds per square
inch. It is no wonder, then, that our patients may be unable to
straighten their shoulders and correct their posture. In fact, within
minutes of assuming a poor body position, the body will begin to lay
down extra tissue (collagen) to support that position. So think about
this fact the next time you rise up feeling tight and stiff from
leaning excessively over your treatment table!
Cellular level
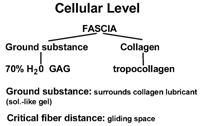
At the cellular level, the most important components of fascia are the collagen and ground substance. Collagen is the main component, representing 40 per cent of the body’s fascia. Fascia holds water in like a sponge and if put under duress, it can dehydrate and become hard, gel-like and sticky. As a side note, remember that 70 per cent of the body is water and 70 per cent of the muscle (which is broken down into fascial sheaths) is also water. The ground substance which surrounds the collagen fibres is made up of GAGs (glycoaminoglycans) and about 70 per cent water. These two components help maintain something called the critical fibre distance between the collagen fibres, thus serving as a kind of lubricant.
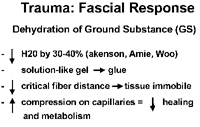
When dehydration of the fascia occurs because of physical and emotional distress, water is pushed out of the tissue. Basically, dehydration turns this lubricant-like solution to more of a gel-like glue. Hence, the critical fibre distance is reduced and the collagen fibres don’t glide as smoothly. This increased fascial compression also places excessive compression on the capillaries. Poor cardiovascular flow occurs and healing is greatly reduced. The result is, then, that extra fascia (of a shortened and thickened nature) will be laid down, all resulting in faulty movement, decreased cellular communication and poor
posture. The final outcome is pain.
Myofascial work strives to reverse this pattern by rehydrating the fascia to a solution-like state resulting in improved movement and posture, and reduction or elimination of pain. As well, the collagen fibres – as part of the fascial network – tend to re-arrange and organize to an improved pattern.
The Nervous System & Fascia
Nervous system response
When you work the fascia, you are involved with the nervous system. All soft tissue has sympathetic innervation. The cardiovascular system is regulated by the sympathetic system which, therefore, regulates the dilation and contraction of the blood vessels. The visceral systems, and thus your organs, are parasympathetic. With myofascial release, you can elicit a nervous system response or release. According to Dr. Michael Shea (founder of the Shea Educational Group), “the autonomic system discharges (electrical) and the soft tissue system releases (physical).”
Implications for therapists
We may not necessarily understand, on a complex level, the details of what occurs neurologically, but we need to be aware, alert and in tune with the patient. If you do too much work or go too deep too quickly, the patient’s body may respond by going into autonomic exhaustion. If this occurs, you will witness any number of responses including tearing, shaking/tremoring, skin colour changes, becoming very quiet, nausea or sweating, among others.
When autonomic exhaustion happens, you need to stop and ask the patient to breathe and get more grounded. Techniques that ground, like cranial work, are good. Being there for the patient is also important. You do not, and should not, attempt to fill the role of a psychotherapist. Just stop what you are doing and ask the patient to breathe. You may shift into doing more Swedish work or gentle modalities such as cranial sacral, even if the patient says it’s okay to continue. There is no reason to continue because it probably won’t have much benefit anyway. It’s critical to observe your patient during the treatment and look for small signs of overload. Even when you stay in verbal contact and observe the body, a patient can still experience overload. Breathe and be there.
Fascia and change: the piezoelectric effect
How these techniques change the body, both structurally and posturally, is due partially to the piezoelectric effect. Molecularly, the myofascial system is arranged as organic crystalline. When pressure is applied to a crystal, it produces a small electrical charge. So when you apply myofascial work, you can generate electrical fields. It is probably here where the nervous system gets involved. As well, tissue that is too tight and under stress is not only dehydrated but also has a lower electrical potential. In short, the tissue moves poorly, and with less strength and power. When you apply myofascial work, you increase the electrical potential which attracts water molecules, thereby rehydrating the ground substance. This is often referred to as the motility response of the tissue, which can be one of the first effects of myofascial release. In addition, the techniques used in this work help to rearrange and organize the fascial network, therefore, the collagen fibres as well. This re-organization to a better, more moveable tissue occurs through a higher brain function. This involves other body systems and incorporates a very important process called integration.
Myofascia Release Theory
Arndt-Schultz Law: 1835
“Weak stimuli activate physiological processes, very strong stimuli inhibit them.”
What this physiological law of homeostasis implies for manual therapy is that in order to improve function, the techniques must be applied slowly and gently in order to create healthy change. You can go deep into a tissue but you absolutely must go slowly and go with intent. If you move too quickly, you will decrease the effectiveness of this work, according to this physiological law.
Gel-Sol Theory and Thermodynamics Another theory on how Myofascial Release works relates to the substance surrounding the collagen, namely the ground substance. As mentioned, this substance is 70 per cent water and 30 per cent glycoaminoglycans. This tissue has the ability to change its internal environment depending on the composition. In order to keep in equilibrium it must continue to move or be moved, and it must remain warm.
Thermodynamics theory tells us that movement creates heat and that this heat will increase molecular movement, therefore keeping the ground substance a solution. It is a looping effect that is not unlike the pain, spasm and immobility conditions we treat daily at our clinics. So, if the ground substance gets chilled from lack of movement, it moves into more of a solid composition which, in turn, reduces the tissue’s ability to move and stretch.
Wolff’s Law: 1836
“The body will mold itself based on the forces applied to it.”
More importantly, we can help the body to remold itself by reducing fascial restrictions. This frees up the tissue, thereby allowing the body to realign to a better, more functional place in space.
Lateral Line: Balancing the Front with the Back
We want to begin these sessions from an esthetic view. Can we soften the body and balance it more by moving or releasing restricted fascia somewhere? Ask yourself what the relationship here is. What would be freer? We are going to look at this session as a broad release and we’ll do some detail work later. Finally, we will integrate the whole session at the end.
Direct Technique Application
“Deep” vs. deep
Often when therapists mention how deep they work, they are referring to pressure. Yet, when Ida Rolf said to work deeper, she was not talking about pressure at all. In fact, there is more and more research showing that excessive manual pressure can drive the trauma (both emotional and
physical) deeper into the body. Therefore, it is imperative that you do not overpower the muscular system and, more importantly, the nervous system. Don’t go deep; think deep, and you will be.
Pain
Pain is not the goal. Any myofascial release or any other form/style of manual therapy that elicits pain beyond a patient’s tolerance is both unethical and against any myofascial release theory relevant today.
Many forms of bodywork evolve and some do not. The form of myofascial release we teach is both somatic and practical, as well as client-based. Let’s not add to the
trauma, as Peter Levine would say. Go slow, go deep, be present.
How much pressure then?
How much pressure should you use? The short answer is as much as you need to elicit a softening of the fascial tissue but not so much that you bombard the sympathetic nervous system. When doing myofascial work, do not try to apply every ounce of pressure you have in your body.
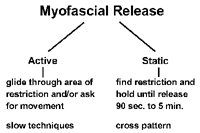
When applying your technique, go in very slowly and try to sense what this person’s body needs and wants. By moving very slowly, you can go in deeply and yet not over-ride the patient’s system. Generally, begin slowly and move as the tissue allows. If you come to a particular area that is very hard or stuck, pause briefly and wait until the tissue warms up. Basically, what is happening is that the fascial structure is changing from a glue to a solution.
If you go in too quickly or too hard, not only will the patient resist you, but you will cause the fascia to become harder – exactly the opposite of what you want. Less is more. At times you will have to stop, slow down or even quit. If the area is not softening after a few minutes, stop and go to a different area which may be only a couple inches away.
Applying the techniques
Applying myofascial work is very easy. The techniques are applied without the use of a lubricant. Only use oil if you must – such as on extremely dry skin or if there is excessive hair in the area being treated, and apply only a very little to your own skin. If you use too much oil, forget about working the fascia. One myofascial release therapist claimed that he only used one ounce of oil every two months!
There is no hard and fast rule of what direction or angle to use. And, there should not be, as each patient is built differently and has different needs according to what they are presenting you with at your clinic. Go into the tissue at an angle and the direction depends on what your goal is with this patient. Classically though, you move out the limbs, up the anterior chest, down the back and down the sides. You can also take the tissue towards the midline axis of the body.
Move the tissue to where you feel it should go and look right. Go in the opposite direction if the movement is better – that’s if the technique flows better – and you will often get a better response from the tissue as well. So if you are working the tissue and it is just not moving; or it feels like you’re riding your bike down a set of railroad tracks, consider going at a different angle and direction and reduce your pressure.
Ida Rolf felt that the body was a plastic medium which, like clay, could be molded with a therapist’s hands. Some of the art of manual therapy has been lost. This work will allow you to get into this art again. Many therapists have seen the most successful changes with their patients when they allowed themselves to find the art.
Parking
In fascial work, parking on the tissue may be painful. Holding an area can be counter-productive and serves no purpose here. We are not doing trigger point work. In fact, it is not generally advisable to work with trigger points, as it can be too much stimulation for the body when applying myofascial release. Fascial work will often release trigger points as well.
One of the strengths of this style of technique is that it allows for tremendous artistic freedom. You can look at an area of the body and say “what does this need … what does it want?” And often, where you think the problem is, it isn’t. That’s why we have so many patients coming
to see us for treatment.
|
|||
| Click here for larger image
|
The basics of technique
- Place the patient in the best position for ease of technique and comfort for the patient and yourself. Take your time and if you need to change, do so. Never hesitate to change the positioning, especially if you are uncomfortable or straining yourself.
- Move into the tissue slowly and gently at an angle.
- Move slowly until you find a tight or stuck area.
- Take this stuck tissue to its proper anatomical position. You are generally following the muscle from origin to insertion, but this depends on the structure with which you’re working.
- Ask for movement from the patient (optional).
- Keep in continual contact (verbal, etc.) with your patient and remind them to breathe. Be aware of “where” they are.
- Don’t park. Continue to move or glide slowly.
- If nothing is happening – stop, move away, have a drink of water and try to stop thinking. Often, as you become more comfortable with the work, you will gain intuition which will tell you what to do next.
- If the technique is painful to you, stop. You are either doing it wrong or you need to change yours or the patient’s position.
- Avoid overworking the patient’s body physically and emotionally. Take breaks and breathe.
- Finally, if you think you’re moving too fast, you are. Slow down.
Movement
Asking the patient to move, or even just visualize a movement of a joint or limb, adds greatly to the technique. It allows for the patient to be in control and present in the therapeutic intent. Movement also helps to integrate the release into the nervous system. This integration helps the change in structure to hold and supports the re-patterning, positioning and proprioception.
Whatever movement increases the feeling or sense of release is appropriate. For example, if the lower leg is excessively rotated internally, have the patient try to reverse this.
Please note that this is a very simplified description of an extremely complicated and important mechanism. Additional readings can be found in the list of resources at the end of the manual.
General Treatment Sequence for Side Lying
Focus of intent: To balance the front with the back and to create a balanced midline.
Assessment: With your client standing, take a global view of the body and see where it is in space. What seems more anterior or posterior, drawing an imaginary line down the side of the body? What tissue could you release to give more slack to a tight structure?
- Work up the side of the ribs to the axilla
- Free up the serratus posterior and anterior; have your client reach
- Traction the hip at the iliac crest and use your opposite hand to pull the lower ribs up; have your client breath gently into the floating rib
- Work down into the gluteous muscles and the tensor fasciae latae; have your client gently tuck their tailbone
- Proceed down the iliotibial band and add the spreading move to further release; have your client press out with their knee; movement should come from the bone (i.e. refined and soft)
- Work the head of the fibula and continue down the lower leg
- Spread out and move from the deltoid and up the lateral neck to the occiput; spend some time with the TMJ area and the temporalis
- Release the suboccipital area
- Clean off the lateral border of the scapula
- With your arm alongside and internally rotated, release the deltoid triceps and the lower arm
- Apply some input into the lateral maoeolus
- Release the adductors and continue the release into the medial lower leg, finishing with the medial malleoli
Strengthening
Once the fascial restrictions have been reduced, have the patient
perform strengthening remedial
exercises. As stated in the Journal
of Applied Physiology (vol. 5, 1981), fascial trauma can reduce muscle strength by up to 20 per cent. Hence, your rehabilitation will be more successful by reducing fascial restrictions and then strengthening the muscle.
Frequency
Try to book treatments consecutively, about one to two weeks apart for four to six weeks. Tell clients they must follow this plan to see success; seldom will a patient refuse. After the first treatment, most people want to continue because they have seen results. Let the work promote itself.
Contraindications
Generally, if you can work the area using regular manual therapy techniques, you will be able to use Myofascial Release. Pain is your guide. You will have to adjust your speed, pressure and time in accordance with what you are presented clinically. Use your therapeutic common sense in dealing with more complicated or acute injuries. After a traumatic injury, such as in a car accident, wait two to three weeks before applying fascia work, depending on the severity. If a client suffers from fibromyalgia, tolerance for this work will depend greatly on his or her constitution.
Contraindications to MFR:
• Acute circulatory conditions
• Malignancy
• Cellulitis
• Systemic or local infection
• Sutures
• Advanced diabetes
• Osteomyelitis
• Hematoma
• Aneurysm
• Osteoporosis
• Hypersensitivity of skin
• Obstructive edema
• Healing fracture
• Acute rheumatoid arthritis
• Anticoagulant therapy
• Open wounds
Post-treatment protocol
Tell clients they may feel sore for two to three days after treatment. Explain that any bruising will only be temporary and that their body is remodelling and going through major changes. Have them drink lots of water and apply ice as needed.
Side effects
Surprisingly, we have found that patients have less post-treatment side effects from this work than from other manual therapy. There is a possibility, though, that your patients may experience one or all of the following:
- tenderness
- redness
- slight discolouration; i.e., bruising
Bruising indicates that the technique may have been applied too quickly. Going into the tissue too fast is the most common difficulty that results when beginning to use these
techniques. It takes time,
patience and practice.
|
|
|
|
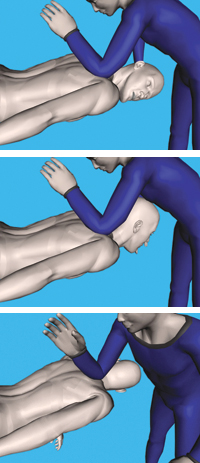
Levator Scapula: Prone
Positioning:
Your client is prone.
Technique:
Treating the right levator, have your patient rotate their head all the way to the right. Next, place your left or right elbow on the levator fascial attachment on the scapula. Engage and hold this
tissue and instruct the patient to begin to slowly lift their head off the table and rotate all the way to the left. Repeat two to three times.
Repeat for the opposite side.
Advanced Release:
Have your client perform the same movement, but this time engage the levator attachment with your elbow and glide inferiorly down the scapula along the medial border while the client is rotating their head.
|
|
|
|
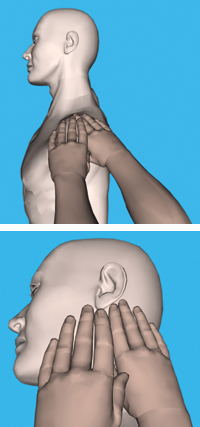
Lateral Neck: Sidelying
Purpose:
With this technique, we are looking to release the lateral fascial triangle which has not only multiple layers, but many separate fascial sleeves.
This is an excellent release for the scalenes, mid traps and general lateral neck fascia. You do not need to apply that much pressure here and you should keep observing your patient for any signs of overload.
Positioning:
Therapist: Stand on a stool, with your knee at the mid shoulder of your patient for support.
Patient: Place the patient’s head so that the head and shoulders are aligned properly, using a towel or small pillow, if needed. The top leg should be bent and supported with a pillow. The bottom leg should be straight. Positioning is everything.
Technique:
Use your fingers of both hands to gather some anterior deltoid fascia, just at the top of the shoulder, and begin to move down toward the cervical spine. You are not interested in working any particular muscle, but are trying to release the general lateral fascial plane of the neck and shoulder. This is fascial release not muscle work.
Glide down the top of the shoulder (mostly along the mid trap fibres) and travel up the cervical towards the occiput. Do this stroke three to four times; each time moving slightly posteriorly along the cervical.
 |
|
|
|
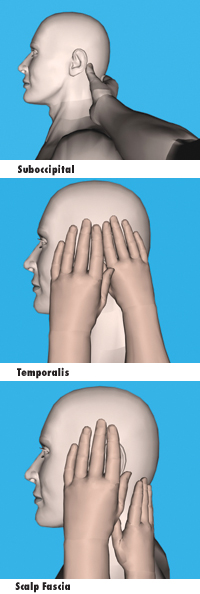
Suboccipital, Temporalis And General Scalp Fascia: Sidelying
Purpose:
This is a natural continuation of the Lateral Neck Release. The temporalis is an area of tremendous fascial restriction and is very underrated in the amount of tensile force it can generate throughout the body.You can spend considerable time releasing the fascia surrounding the skull. To do so, will add greatly to the general cervical fascial release and should always be included. The best tool to use is fingertips. The movement and direction are not as important as the speed and intent to melt this incredible fascial sheath.
Positioning:
The patient will be sidelying, as in the Lateral Neck Release.
Technique:
Suboccipital
Use either your thumb or your fingertips of your furthest hand (i.e., if you are treating the right side, use your left hand), and glide along the mastoid process in three to four small strokes towards the midline of the body. You can spend some time with these strokes releasing the deep fascial attachments along the occipital ridge. In addition, do three to four strokes, moving cephalad to caudal, which begins to release the large ligament nuchae.
Temporalis
Support the patient’s head with one hand. Use the fingertips of your other hand, begin to spread the temporalis fascia, moving caudal to cephalad. Remember to slow down and try to get a sense of the tissue melting and releasing; not pushing or forcing. Note: release the small but generally very tight fascia surrounding the auricularis anterior, auricularis superior and auricularis posterior muscles.
Scalp Fascia
With the fingertips of one hand (supporting the head with the other hand, if needed) begin to release the galea aponeurotica.
|
|
|
|
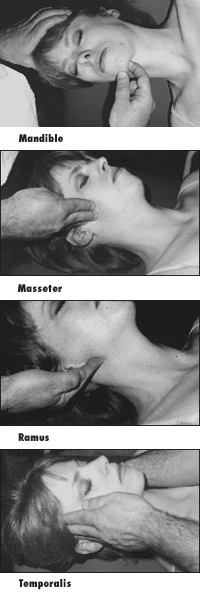
Mandible And TMJ: Supine
Purpose:
Generally you are trying to release the masseteric and parotid fascia. This is a very under-treated area in our work which, if treated, can provide a lot of relief to cervical and head-related pain; i.e., headaches. Shift your thinking from the muscle to the enveloping fascial planes.
Positioning:
Therapist: Stand at the side of the table, facing the patient.
Patient: Lying supine. No pillow is needed for this technique.
Technique:
1. Begin at the midline of the mandible and hook one finger underneath. Move laterally along the mandible to the angle.
2. Once here, reposition your finger near the condylar process and glide down the ramus of the mandible. You need to reposition yourself to release this fascia, which tends to get too thick and matted at this joint.
So, in fact, you are trying to spread this fascia out. Do these techniques three to four times, moving slightly superior, inferior, medially or laterally. Just follow the restrictions when
you feel them.
3. Next, move to the superior aspect of the ramus, and with your fingers, glide inferiorly to the angle of the mandible, supporting your patient’s head with your other hand. You may need to do several strokes to cover this area. Go gently as this can be very restricted and, hence, tender.
4. Next, release the temporalis by starting at the zygomatic arch, moving superiorly with your fingers up the temporalis and accompanying fascia. Feel the restrictions here and move into and through them. In fact, spend some time here on the general lateral fascia surrounding the skull.
|
|
|
|
Scalenes: Supine
Purpose:
With whiplash, the scalenes are probably the most stubborn tissue to treat and, therefore see results.
These techniques, along with the sidelying techniques, will give you and your patient success.
Positioning:
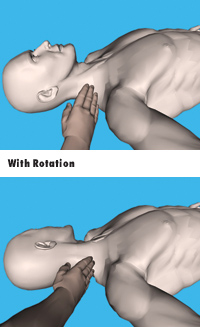
Firstly, with your patient supine, ask them to lift their head off the table. This allows you to slip under the SCM attachment to the occipital ridge and on to the attachments of the scalenes on the transverse processes of the cervical spine. Once you locate the scalenes, have the patient relax their head.
Technique:
With two or three fingers, glide down superiorly to inferiorly along the scalenes, finishing near the anterior aspect of the medial one-third of the clavicle. Take your time and stay in communication with your patient. Note: try not to move too far medially off the transverse process of the C-spine. You do not want to engage the carotid artery. Do this technique three times. Switch sides and repeat.
Movement:
Ask your patient to slowly reach toward their feet with their arm and rotate their head in the opposite direction. Make sure their head is in a neutral position – not tucked in and not going into extension.
Have them pull their chin up while they are rotating their head. This movement creates a better release of the fascia and also allows for patient involvement, which helps to integrate the work.
Print this page